giovedì 20 gennaio 2022

Analyzing an IDA Pro anti-decompilation code


Twitter: @s4tan
GitHub: https://github.com/enkomio/

In this post I'll analyze a piece of code that induces IDA Pro to decompile the assembly in a wrong way. I'll propose a fix, but I'm open to more elegant solutions :)

The function that we want to decompile has the following assembly code (I'm using IDA Pro v7.6):

.text:1001BC95 56                  push    esi
.text:1001BC96 FF 74 24 10         push    [esp+4+arg_8]     
.text:1001BC9A 8B 74 24 10         mov     esi, [esp+8+arg_4] 
.text:1001BC9E 56                  push    esi
.text:1001BC9F FF 74 24 10         push    [esp+0Ch+arg_0]
.text:1001BCA3 52                  push    edx
.text:1001BCA4 51                  push    ecx
.text:1001BCA5 E8 57 20 FF FF      call    nullsub_1
.text:1001BCAA 8B 0A               mov     ecx, [edx]      
.text:1001BCAC 83 C4 14            add     esp, 14h
.text:1001BCAF 89 4E 0C            mov     [esi+0Ch], ecx
.text:1001BCB2 8B 42 04            mov     eax, [edx+4]
.text:1001BCB5 03 C1               add     eax, ecx
.text:1001BCB7 89 46 04            mov     [esi+4], eax
.text:1001BCBA 5E                  pop     esi
.text:1001BCBB C3                  retn


The function uses two arguments with an unconventional calling convention. If we decompile the code, we obtain:

int __cdecl sub_1001BC95(int a1, int a2)
{
  int *v2; // edx
  int v3; // ecx
  int result; // eax

  nullsub_1();
  v3 = *v2;
  *(a2 + 12) = *v2;
  result = v3 + v2[1];
  *(a2 + 4) = result;
  return result;
}
In IDA Pro the v2 variable (corrisponding to the line at address 0x1001BCAA) is colored in red, since its value might be undefined.

Custom calling convention might cause some problems to the decompilation process (see this), but, in general, there exist an easy fix to it: it is enough to inform IDA Pro that the function uses a custom calling convention. By modifying the function, we can set the new type with the following definition:

int __usercall sub_1001BC95@<eax>(PUCHAR arg0@<edx>, int garbage, PUCHAR arg1)
with this new definition, the decompiled code now looks like the following:
int __usercall sub_1001BC95@<eax>(PUCHAR arg0@<edx>, int garbage, PUCHAR arg1)
{
  int *v1; // edx
  int v2; // ecx
  int result; // eax
  int v4; // [esp+Ch] [ebp+8h]

  nullsub_1();
  v2 = *v1;
  *(v4 + 12) = *v1;
  result = v2 + v1[1];
  *(v4 + 4) = result;
  return result;
}
We haven't done any progress at all. The only place where we haven't checked is the nullsub_1 function, the problem must be in its call. If we analyze this function, we notice that it has an empty body, as shown below.

.text:1000DD01 C3                  retn
Why is this function causing problems? The answer is in the software convention used by the compiler. During the compilation, the compiler considers some registers as volatile. This means that the value of these registers, after a function call, should not be considered preserved ([1]). Among the volatile registers, there is EDX, which is exactly one of the registers used to pass a function parameter in the custom calling convention.

This code causes problem to the decompilation process that considers (correctly) the EDX register to have an undefined value after the function call.

I'm not aware of any particular IDA Pro command to inform the decompiler to not consider EDX as volatile, so the simpler solution that I found is to just remove the call instruction (I patched the bytes E8 57 20 FF FF with 90 90 90 90 90). The result is a much cleaner decompiled code, as shown below.

int __usercall sub_1001BC95@<eax>(PUCHAR arg0@<edx>, int garbage, PUCHAR arg1)
{
  PUCHAR v3; // ecx
  int result; // eax
  
  v3 = *arg0;
  *(arg1 + 3) = *arg0;
  result = &arg0[1][v3];
  *(arg1 + 1) = result;
  return result;
}
Now we can proceed to further improve the decompilation code (we can clearly see the usage of a struct in the code) now that the decompiled code represents the real intent of the assembly code.

Update:

I received a message on twitter and reddit that suggests to have a look at the __spoils keyword mentioned in this Igor’s tip of the week post [2] (shame on me for not having found it).

Its meaning is exactly what we need to solve the problem in a more elegant and generic way. It is enough to change the nullsub_1 function definition by adding the __spoils keyword, as show below:

void __spoils<> nullsub_1(void)
The decompilation result of the function sub_1001BC95 is the same as before with the exception that the call to the nullsub_1 function is still there (it is not necessary to patch the bytes anymore).

Links:

[1] Register volatility and preservation
[2] Igor’s tip of the week #51: Custom calling conventions

sabato 18 dicembre 2021

Alan c2 Framework v5.0 - All you can in-memory edition


Twitter: @s4tan
Download: https://github.com/enkomio/AlanFramework
Documentation: https://github.com/enkomio/AlanFramework/tree/main/doc

I just released version 5.0 of my C2 post-exploitation framework Alan. You can download the binaries and read the release notes at: https://github.com/enkomio/AlanFramework/releases/latest

My goal with the Alan project is to provide a post-exploitation framework that can help red-team operators to further compromise their targets. Tipically, each team has its preferred tools to exploit the target, an example is the pletora of tools that can perform the memory dump of the lsass process. Alan does not enforce any particular tool, instead it provides the ground to run whatever tools the operator like. All tools are executed in memory in the address space of a pre-configured host process, or injected into another process.

This feature is achieved by the introduction of the new command run. This command accepts a file path on the operator machine and executes it on the compromised host without touching the disk. It is possible to specify command-line arguments that are passed to the executed program (this feature is not so common in the other C2 framework ;)). For this reason I decided to name this version "All you can in-memory" :)

Other commands were also implemented that allow the operator to execute a program on the compromised host. In particular the command exec was added to execute a new process and the shell command was modified to accept an argument that is the command to execute (if no argument is specified, a command shell is presented to the operator).

Find below the video that shows the following features:

  • Creation of a x64 powershell agent.
  • In-memory execution of the nanodump utility by using the configured host program (raserver.exe in this case) and passing a command-line argument. The Process Hacker windows will display the execution of the raserver.exe process.
  • Execution of the program notepad.exe in background.
  • In-memory execution of the dumper utility by injecting the binary in the just created notepad process. In this case the raserver.exe is not executed.


domenica 26 settembre 2021

Alan post-exploitation framework v4.0 released


Twitter: @s4tan
Download: GitHub
Documentation: https://github.com/enkomio/AlanFramework/tree/main/doc

I just released version 4.0 of my post-exploitation framework Alan. You can download the binaries and read the release notes at: https://github.com/enkomio/AlanFramework/releases/latest


I also made a video that shows the following features:

  • Creation of two agents, a x86 and a x64 version
  • Migration of agent x86 to a process with a different integrity level
  • Execution of a command-shell on the compromised host and the execution of the x64 agent directly from the command-shell
  • Migration of the x64 agent to another x64 process
  • Restart of the Alan server to show that the agents reconnect to the server after the restart (the agent session is not lost)


sabato 15 maggio 2021

Alan - A post exploitation framework


Twitter: @s4tan
Download: GitHub (use this repo to report issues)
Documentation: https://github.com/enkomio/AlanFramework/tree/main/doc

I decided to dedicate a bit of my free time to develop a new project: Alan, a post exploitation framework. Doing red-team activities is not my main job, but I like this field and, as a malware analyst, I analyze a lot of programs that have a very similar intent.

The Alan concept is simple: the operator creates an agent file that is executed on the compromised host, and receives commands from a server under to control of the operator. The goal of the project is to provide a framework that has as primary target red-team activities. I implemented it by using C/Assembly for the agent and F# as backend (with .NET core, this ensure the excution on various OS).

Alan is implemented by considering weaknesses and missing features that I found in some of the currently available red-teaming tools. For example, a lot of tool claims that the traffic with the server is encrypted but they embed the key inside the request, or, in other cases, the key can be retrieved if the binary is available for reversing (too often I found a key generation algorithm based on a seed that can be easily computed).

A post-exploitation tool

Alan supports a good amount of features allowing the operator to further comprimise the target after the initial exploitation. Alan agent can be deployed in various formats, such as: Executable, DLL, Powershell and Shellcode. Below you can find a video that shows how to create an agent and interact with it by launching a command-shell on the remote host.


The agent can be easily customized and flexibility is a key feature for Alan. The agent profile can be updated at runtime, this means that you can change server address or even the communication protocol! The video below shows how to change the agent profile at runtime, by specifying a different server port and moving from HTTP to HTTPS.


Security Operation

Beign caugth by a blue team is something that should be avoided if you don't want to lose access to your target. Unfortunately, network traffic is something that cannot be hidden. Alan encrypts the network traffic in a strong way, but even if encrypted the requests might look suspicious. To avoid to raise any alerts, the operator can increase the delay between two requests or customize the requests and server reponses to look as a normal HTTP traffic from a know application. The video below shows the following features:
  • Create a powershell agent
  • Migrate to notepad.exe process. When the migration is completed in the Fiddler window is possible to see that the process sending requests became notepad.exe
  • A command-shell is executed and the original agent powershell file is deleted. By deleting the file there is no trace of the agent on disk and the execution is performed only in-memory. Then, the operator downloads some files to his system
  • The HTTP network traffic is inspected. The agent network traffic looks like normal traffic to an nginx server with default installation


In the next release I'll implement additional features and strenght a bit the code to try to avoid easily detection by AVs ;)

venerdì 12 giugno 2020

Deobfuscating C++ ADVobfuscator with Sojobo and the B2R2 binary analysis framework


Twitter: @s4tan
GitHub code: https://github.com/enkomio/Sojobo/tree/master/Src/Tools/ADVDeobfuscator

At Black Hat Europe 2014 - Amsterdam was presented a new obfuscation tool named ADVobfuscator. It is based on C++11 metaprogramming. The paper describes in depth how the strings and function calls are obfuscated.

ADVobfuscator demonstates how to use C++11/14 language to generate, at compile time, obfuscated code without using any external tool or a custom compiler.
Compile time obfuscators (like this one) are quite annoying to analyze since it is not easy to write a generic deobfuscator that it is based on code patterns recognition. In fact, the resulting binary code depends on the compiler, the used flags and so on. This will result in a series of corner cases that must be correctly handled to correctly deobfuscated the code. The worst part is that the handling of these corner cases might not be reused for a different sample that was compiled with a different compiler or with different flags. My idea to solve this problem, it is to write a deobfuscator that is based on flags extracted through the execution of generic heuristics. In this way, I can abstract the analysis from the code details.

Another interesting aspect of ADVObfuscator, it is that it was recently used to protect a malware sample that was analyzed in this very interesting blog post. In particular, in section "3. Latest variant of Team9 loader", it is possible to see a reference to the strings deobfuscation process.

In this blog post, I'll focus on the strings obfuscation part, by writing an utility that is able to decode the obfuscated strings. The deobfuscation utility uses the B2BR binary analysis framework to statically analyze the binary, and Sojobo to emulate the code.

The sample that I'll consider has SHA256 hash value: aaa9268b4a80f75eeb58b61cbd745523b1823d5adf54c615ad9ddf6b8fa0e806. It was used in a demo during my talk at HackInBo Safe Edition and can be downloaded from my GitHub repository.

Identify obfuscated strings

This is probably the most annoying part. We can't rely on specific code patterns, since according to the used compiler, the code might change. My idea was to abstract this concept and tries to identify interesting points, by using a series of heuristics. ADVObfuscator uses various methodologies to obfuscate the strings, some of them are reported below:

1400012AA    movdqa  xmm0, cs:xmmword_140023520          ; load obfuscated buffer
1400012B2    movdqu  [rbp+57h+var_90], xmm0
1400012B7    mov     rcx, r14
1400012BA
1400012BA loc_1400012BA:; CODE XREF: sub_1400011F4+D4↓j
1400012BA    mov     al, byte ptr [rbp+57h+var_90]
1400012BD    xor     byte ptr [rbp+rcx+57h+var_90+1], al ; deobfuscation
1400012C1    add     rcx, r15                            ; Increase counter
1400012C4    cmp     rcx, 0Eh                            ; check size
1400012C8    jb      short loc_1400012BA
1400012CA    mov     byte ptr [rbp+57h+var_90+0Fh], r14b ; set null byte
Unfortunately, not all deobfuscation tasks are implemented as in-line code, in some cases a function is invoked, as reported below.

140006161    movdqa  xmm0, cs:xmmword_140023800          ; load obfuscated buffer
140006169    lea     rcx, [rbp+var_30]                   ; pointer to the obfuscated buffer
14000616D    xor     eax, eax
14000616F    mov     [rbp+var_20], 627A6844h
140006176    movdqu  [rbp+var_30], xmm0
14000617B    mov     byte ptr [rbp+var_1C], al
14000617E    call    sub_140003684                       ; call deobfuscation function
140006183    mov     r9d, r15d
..............
140003684 sub_140003684   proc near  ; CODE XREF: sub_140005EB8+2C6↓p
140003684    lea     rax, [rcx+1]                        ; skip first byte, which is used as key
140003688    mov     r9d, 13h                            ; set string size
14000368E    mov     r8, rax                             ; pointer to buffer to decode
140003691
140003691 loc_140003691:; CODE XREF: sub_140003684+19↓j
140003691    mov     dl, [rcx]                           ; read XOR key
140003693    xor     [r8], dl                            ; deobfuscation
140003696    inc     r8                                  ; increment buffer pointer
140003699    sub     r9, 1                               ; decrement counter and check for termination
14000369D    jnz     short loc_140003691
14000369F    mov     [rcx+14h], r9b
1400036A3    retn
1400036A3 sub_140003684   endp
In the later case, it is possible to see that the string size is hardcoded inside the function body and not passed as input parameter. This means that we have a lot of functions like that, that differ only for some minor changes (like the string size).

Heuristics definition

As said, my main idea is to analyze all the functions that the B2R2 framework is able to identify and extract the flags that are based on the heuristics that I created. You can find all the defined heuristics in the associated source code. An excerpt from that list is presented below:
The heurstics above are used for the following tasks:
  • Identify all functions that deobfuscate a string. This task is useful to cover the case of the deobfuscation process defered to another function.
  • Identify the start of the code in charge for the deobfuscation.
  • Identify the address of the buffer that will be deobfuscated. This is done by identifying the deobfuscation operation.
  • Identify the end of the code in charge for the deobfuscation.

Emulation

At this point I have the following information: the functions that run a deobfuscation task and the related chunk of code in charge for this task. The final step is to emulate this code and read the deobfuscated string from memory. Before to run the emulation it is necessary to execute one final step. The heuristics might miss some important information, like the register that is used to increment the counter (in one of the example above we can see that r15 is used to increment the counter).

To cover this problem I used two strategies. In the first strategy, I do a backtrace analysis starting from the identified start address, and verify if the instruction is safe to be emulated. If so, I'll change the start address. The second strategy analyzes the instructions that should be emulated and if it notices that exists an operation that add two registers, I set the value of the source register, inside the emulator, to the value 1.
These strategies seem to be good enough to catch possible registers initialization code.

We can now run the emulator and read the decrypted string from memory.

Result

Below is reported a short video of the execution of the deobfuscation tool on the considered sample. With these information it shouldn't be too difficult to patch the original file and to NOP the deobfuscation operations. I tested it on various samples and it seems to work properly. If you found any errors just send me a message on twitter.


martedì 17 dicembre 2019

Writing a packer in Sacara

Twitter: @s4tan

GitHub project: https://github.com/enkomio/sacara

Release: https://github.com/enkomio/sacara/releases/latest

Sacara packer script: https://gist.github.com/enkomio/35b14084c1422db6740b5ed98cdb2db7

The Sacara project

It is a while that I don't write a blog post and recently I had the opportunity to work again on the Sacara project. I really like this project since it allows me to:
  • write code in x86 Assembly since all the VM code is implemented in x86 Assembly
  • to better understand how to implement a simple programming language (you can find the Sacara grammar file here)
  • how to write an assembler.
My previous post on Sacara is more than 1 year old so it is a good time to see if the project has any issues that can be resolved. After trying to write a new script, I immediately realize which was the biggest defect, writing a program was quite a pain due to the awkward syntax. It is time to improve this aspect with some syntax sugar :).

I released a new version 2.4 which adds some directives and other features that allows to easier the task of writing of a new script, leaving the VM core almost untouched.

Writing a simple packer

As done in my latest post about Sacara, even in this one I'll try to see how the AV industry will behave by analyzing a malicious program. I'll write a simple program that executes a Sacara script which purpose is to decode and run a malicious content.

This is the typical behavior of a packer, in my case I'll just decode and run the embedded content as if it was a shellcode. In general a packer will correctly maps the PE in memory and executes it by locating the Original Entry Point (OEP) but I'll leave this aspect out.

This time I'll create a C project and linking the Sacara static library, in this way we will have just one binary (and not a bunch of files as in my .NET test project created in my previous post).

For my test I wanted to use a real malware so I looked for some good stuff in VT. In the end I decided to use an unpacked Cobalt Strike payload whit SHA-1: 83a490496a7ea9562d6e3eb9a12a224fe50875e7. This is a perfect fit for my case since all Cobalt Strike modules are packed in a way that can be executed as a shellcode starting for the DOS header (the same happens with the Metasploit meterpreter_loader).

The overall design is quite simple, I'll embed the encoded malicious content as a PE resource and will use a Sacara script to decode and execute it. The Sacara script will be embedded as a PE resource too. The task done by the C code is deadly simple, just read the needed resources, allocates a memory region and run the script by providing the input buffer.

Implementation

I'll focus on the Sacara script, you can read the source code of the C code from the repository. The tasks done by the script are:
  1. Decode the password used to encrypt the malicious code
  2. RC4 decrypt the resource content
  3. Run the decrypted code
In order to easier the development and debugging of the script, I'll create various standalone scripts for each task and I'll merge them at the end. All the scripts in this post can be found in the test directory.

Decode the password used to encrypt the malicious code

As first step we want to retrieve the password used to encrypt the content. We don't want that a simple string search will reveals its value, so we will obfuscate it with a simple XOR operation by using a 1-byte key with value 0xA1.

Below you will find the relevant code with a simple test case, I think its comments are self explanatory.

// this routine will be used to stored the 
// script global data, all labels are global
proc global_data
password: 
 // encoded password
 byte 0xe0, 0xe1, 0xe2, 0xe3
endp

proc decode_password(pwd, pwd_len) 
 .mov index, 0
 
decode_pwd_loop:
 // read the byte to decode
 .mov pwd_offset, (pwd + index)
 .read.b pwd_offset 
 pop xored_char
 
 // decode the byte with hardcoded key
 .xor xored_char, 0xA1
 
 // write back the result
 pop xored_char
 .write.b pwd_offset, xored_char
 
 // check if completed
 .cmp index, pwd_len
 .inc index
 push decode_pwd_loop
 jumpifl 
 
 ret
endp

proc main
 // result must be the first variable if I want
 // to retrieve the result with SacaraRun, so set it to 0
 .mov result, 0
 
 // invoke the routine to decode the password
 .decode_password(password, 4)
 
 // read the decoded password as a double word at the specified offset
 .read.dw password
 pop result
 halt
endp
To test if it works, we will try to deobfuscate the buffer 0x41, 0x40, 0x43, 0x42. We have to first obfuscate it, so we will compute the XOR operation between the two integers 0x42434041 (little endian) and 0xA1A1A1A1, which result in 0xE3, 0xE2, 0xE1, 0xE0 (this is the same buffer that you will find at the top of the script).

Firs let's assemble it:
c:\SacaraAsm.exe test_decode_buffer.sacara

          -=[ Sacara SIL Assembler ]=-
Copyright (c) 2018-2019 Antonio Parata - @s4tan

[INFO] 2019-12-08 11:52:07 - VM code written to file: test_decode_buffer.sac
We can now test the script by running it, passing the input value 0x42434041 and expecting as result 0x42434041 (or 1111703617 in decimal notation) which is the little-endian hexadecimal notation of our buffer.
c:\SacaraRun.exe -p test_decode_buffer.sac 0x42434041
Execute file: c:\test_decode_bufferdecode_password.sac
Code execution result: 1111703617


RC4 decrypt the resource content

Our second and most complex step is the decryption of the buffer. In my previous post I used a simple XOR algorithm, for this post I decided to implement the RC4 cryptographic algorithm. If you are used to reverse malware you have probably encountered the usage of RC4 to encrypt configuration or code.

As in my previous script I'll use a lot of comments to make the code easy to understand (I also avoided some trivial optimization to avoid over complication). Since this code is quite long you can find the source code of this step in a test script, in this post I'll only show the KSA and PRGA phases.
proc ksa(password, password_length)
 .mov i, 0
 .mov j, 0

ksa_loop:
 // read the i-th byte from S array
 .read.b (S + i)
 pop S_i
 
 // read the i-th byte from password
 .read.b (password + (i % password_length))
 pop pwd_i
 
 // compute loop expression
 .mov j, ((j + S_i + pwd_i) % 256) 
 .swap(i, j)
 
 // check if I have to iterate
 .inc i 
 .cmp i, 256
 push ksa_loop
 jumpifl 
 ret
endp

proc prga(buffer, buffer_length)
 .mov i, 0
 .mov j, 0
 .mov n, 0
 
prga_loop:
 // update index i
 .mov i, ((i + 1) % 256) 
 
 // update index j
 .read.b (S + i) 
 pop S_i
 .mov j, ((j + S_i) % 256)
 
 // swap
 .swap(i, j)
 
 // read indexes
 .read.b (S + i) 
 pop S_i
 
 .read.b (S + j) 
 pop S_j
 
 // compute random
 .read.b (S + ((S_i + S_j) % 256))
 pop rnd
 
 // read n-th buffer value
 .read.b (buffer + n)
 pop buffer_n 
 
 // XOR with buffer and write back the result 
 .xor buffer_n, rnd
 pop encrypted_char
 .write.b (buffer + n), encrypted_char 

 // check if I have to iterate
 .inc n
 .cmp n, buffer_length
 push prga_loop
 jumpifl
 
 ret
endp

The assembling step is the same as before.

Run the decrypted resource

At this step we have the code in a decrypted form, we just have to run it. This can be done by the infrastructure code (the C code) or from Sacara. Since Sacara allows to invoke native code via the ncall instruction we will use this approach.

Build the code

Now we have all the pieces for our packer, once compiled the infrastructure code we can add the needed resources, that are:

  • DATA: contains the buffer that will be decrypted and executed.
  • SECRET: is the RC4 password that will beu sed to decrypt the buffer. It is XOR encoded with the 0x41 value.
  • SACARA: the Sacara code that will decrypt the buffer and execute it.


To add the resources you can use a simple utility that I wrote or any other PE explorer utility. Finally, the full source code of the Sacara packer can be found here.

Evaluation

As said my test will run a Cobalt Strike Payload encrypted with RC4 and the password: sacara_packer_password. I uploaded the file to VT and waited for the analysis, the result can be found here. We went from 52/70 to 24/69.

Not bad but to be honest I was expecting a better result. If you run the code in a real environment you will notice that the decryption of the code is quite CPU intensive and needs several seconds before to be invoked, this means that the identification of malicious content via emulation is improbable due to performance reason.

I decided to do a second test and upload the same program but without resources, this will make the program 100% safe. The result was very interesting, 12/69 AV flagged my sample as malicious. This means that they flagged the Sacara code as malicious and not real payload.

Conclusion and Future Work

This new version of Sacara improved the language in order to easier the development of a script. The next step is to provide an easy access to the Windows API in order to create more meaningful programs. Also, I want to improve the VM code in order to make it more resistant to reverse engineering.

Finally, I want to stress out that a single test case is not a valid reason to decide if an AV is good or not, so please take my result as a first step in the complex process of AV evaluation.

giovedì 6 giugno 2019

hm0x14 CTF: reversing a (not so simple) crackme

Twitter: @s4tan

Writeup GitHub project: https://github.com/enkomio/Misc/tree/master/Hm0x14Writeup

I'm not used to participate in CTF competition but in this case I personally know the author of this challenge and I consider her to be very smart, so I decided to give it a try. As I hope to show in this writeup, the challenge is very interesting and not the typical reverse engineering challenge.

Introduction

The challenge file is:

hm0x14.exe
SHA-256: 7cad36c64df33e30673d98e24be4d60c38ba433aa72f8d2bec14f69db4dbf173

It is a C++ application. As first step I run the application to see what it looks like. I have to admit that the author put a lot of effort in making the challenge appealing from a UI point of view. Below an image of the run of the challenge:


Analysis

Before I continue, I have to say that this challenge remained unsolved since its creation. For this reason the author decided to have a talk on how to solve it. This write up is not based on her presentation.

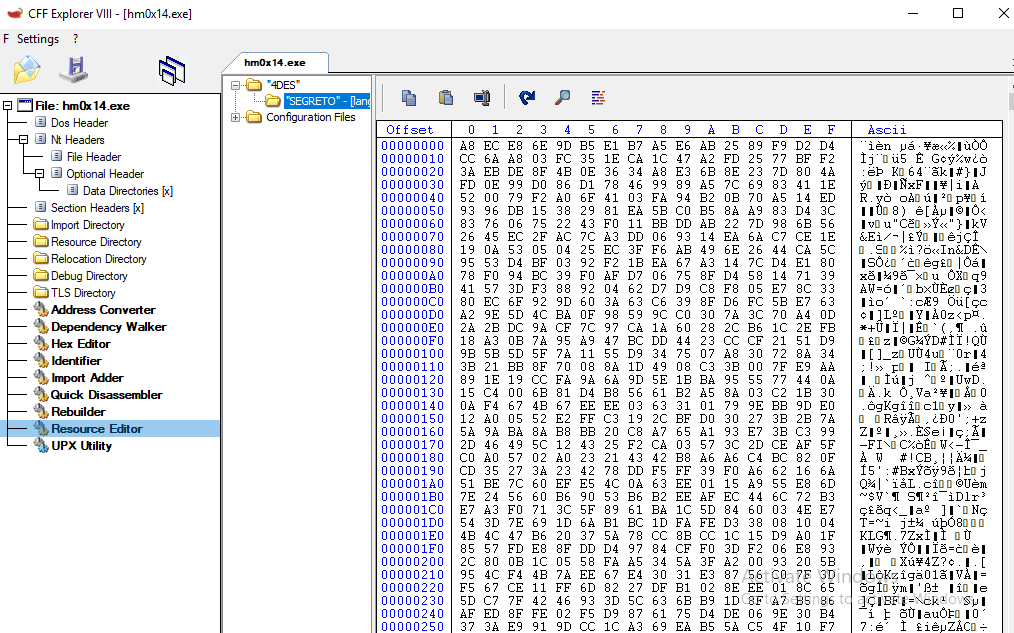
When you open the file in IDA you can immediately see that the main function is quite big. Taking a look at the decompiled source code we can see that the program initializes a DES provider and then read the resource Segreto from 4DES which content is displayed in the image below:


Proceeding with the debugging, it is clear that most of the code is in charge for the UI animation. After stepping a bit with the debugger, it will block on the function that reads the input password. After this function, it is easy to trace the program and see which is the function that accepts as first parameter the input password (which is, in this case, the string "1234567890").


00402E97 | 8D8D 50FEFFFF | lea ecx,dword ptr ss:[ebp-1B0] |
00402E9D | 50            | push eax                       | eax:&L"1234567890"
00402E9E | E8 08F2FFFF   | call hm0x14.4020AB             |
00402EA3 | 59            | pop ecx                        | ecx:L"xe"
00402EA4 | 33C0          | xor eax,eax                    | eax:&L"1234567890"


By decompiling the code we can see that the main goal of this function is to invoke another function that I called hash_chars and then generates 4 symmetric keys. Since in the video there is a 4DES banner I suspect that this function creates 4 keys that will be used in this new crypto algorithm :)


  memset(&v25, 0, 0x20u);
  if ( v7 )
    v8 = password;
  else
    v8 = *password;
  hash_chars(v8, &v25, v6);            ; generate 4DES key buffer (8 byte = 64 bit, a typical DES key length)
  if ( *(password + 20) < 8u )
    v9 = password;
  else
    v9 = *password;
  hash_chars(v9 + 2 * v6, &v26, v6);   ; generate 4DES key buffer (8 byte = 64 bit, a typical DES key length)
  if ( *(password + 20) < 8u )
    v10 = password;
  else
    v10 = *password;
  hash_chars(v10 + 4 * v6, &v27, v6);  ; generate 4DES key buffer (8 byte = 64 bit, a typical DES key length)
  if ( *(password + 20) >= 8u )
    v3 = *password;
  hash_chars(v3 + 6 * v6, &v28, hKey); ; generate 4DES key buffer (8 byte = 64 bit, a typical DES key length)
  v11 = v19;
  v12 = bcrypt_generate_symmetric_key(v19, &hKey, &v25);
  v13 = bcrypt_generate_symmetric_key(v11, &v22, &v26);
  v14 = bcrypt_generate_symmetric_key(v11, &v23, &v27);
  v15 = bcrypt_generate_symmetric_key(v19, &v21, &v27);      ; <----- ?!? (1)


At this point we are not in good luck, since breaking this algorithm seems to be not so easy (just consider that 3DES is still considered a strong algorithm). Let's take a look at the function in charge for creating the key from our password, in the image below I have highlighted the main points:

The loop is executed a number of times that depends on the password length. The meaning of the various circles is:

* blue circle: read the ith character of the input password

* orange circle: this is the main code. It just multiplies the current key value for 0x1F and save only the low DWORD result value (remember this fact).

* green circle: the value of the blue circle is added to the result

* read circle: before to return the result in the ESI register, the value is shifted left by 5 (other point to remember)

The code to generate the key from a password can be represented by the following F# code:


let hashChunk(password: String, offset: Int32, rounds: Int32) =
 let mutable result = 1UL
 for i=0 to rounds-1 do
  result <- (result * 0x1FUL) + uint64 password.[i + offset]
 (result <<< 5) &&& 0x00000000FFFFFFFFUL

let generateKey(password: String) =
 let keys = [
  let size = password.Length >>> 2
  for i=0 to 3 do
   let value = hashChunk(password, i * size, size)
   yield BitConverter.GetBytes(value)
 ]     

 (keys.[1], keys.[0]) // I'll exaplin later why I only return these two keys


Finally, the decryption of the resource content is done by executing the following code:


Which can be summarized as:

P = D(E(D(E(C, k1), k2), k3), k4)


If during the decryption the application identify an error, the image of the skull is displayed (if you are wondering which skull, watch the first video till the end ^^).

Implementation Errors

Let's take a break to do a recap of the info that we have. Despite the fact that each key is 8 bytes long, only the first 4 bytes are used, so here we have the first error. However, breaking such a keyspace is still not feasible with my laptop.

One of the most important aspect that will help us is pointed out in the decompiled code above with reference (1). I'll rewrite the code below for easy reference:


v12 = bcrypt_generate_symmetric_key(v19, &hKey, &v25);
v13 = bcrypt_generate_symmetric_key(v11, &v22, &v26);
v14 = bcrypt_generate_symmetric_key(v11, &v23, &v27);
v15 = bcrypt_generate_symmetric_key(v19, &v21, &v27);


Do you see it? The last two operations reference the same exact value! By debugging the application we can notice this fact since the first two operations use the same key, invalidating the result. So the effective decryption process is:

P = D(E(D(E(C, k1), k1), k2), k3) = D(E(C, k2), k3)


So we downgraded the algorithm to a 2DES and if you have ever followed a cryptographic course, you know that there is a reason if we jumped from DES to 3DES by skipping 2DES.

Meet In the Middle

The reason why 2DES is considered not secure is for this specific attack. By quoting wikipedia:

When trying to improve the security of a block cipher, a tempting idea is to encrypt the data several times using multiple keys. One might think this doubles or even n-tuples the security of the multiple-encryption scheme, depending on the number of times the data is encrypted, because an exhaustive search on all possible combination of keys (simple brute-force) would take 2^(n-k) attempts if the data is encrypted with k-bit keys n times.

The MITM is a generic attack which weakens the security benefits of using multiple encryptions by storing intermediate values from the encryptions or decryptions and using those to improve the time required to brute force the decryption keys. This makes a Meet-in-the-Middle attack (MITM) a generic space–time tradeoff cryptographic attack.

The MITM attack attempts to find the keys by using both the range (ciphertext) and domain (plaintext) of the composition of several functions (or block ciphers) such that the forward mapping through the first functions is the same as the backward mapping (inverse image) through the last functions, quite literally meeting in the middle of the composed function. For example, although Double DES encrypts the data with two different 56-bit keys, Double DES can be broken with 2^57 encryption and decryption operations.


Since we know that our key is 32 bit long we can break this encryption with 2^37 operations. Nice... in theory. I don't know about you, but my laptop is still not so powerful to break such a keyspace. There must be some other way to downsize the key.

Indeed, there is! If you take another look at the function that generates the key from a password you will notice that the final result is left shifted 5 times, this means that the least 5 important bits are always zero! With this information we can downgrade the key from 32 bit to 27 bit!

At this point I started to implement the algorithm, but 27 bit are still too much for my laptop. I have to confess that I was stuck at this point. Talking with the author, she told me that there is still a way to downgrade the key size from 27 to 24 bits.

I struggled a bit on this part, until I realized, the parity bit! It is pretty know that DES uses a key of 64 bits but the effective size is 56 bits. This is due to the fact that the last bit is used as parity bit and it is not consider in the encryption process. Since we have 3 full bytes (the last one is shifted by 5 so doesn't count), by removing 1 bit from each byte we reach the final size of 24 bits.

Finding the plaintext

At this point we have in place the theory and the feasibility of the attack but we miss one last piece, the plaintext to encrypt. Unfortunately the program doesn't seem to give any hints on the format of the plaintext, so I decided to take another look at the program. As every experienced reverse engineering in the world would do, I run the most sophisticated analysis, I run strings on the binary. I discovered some interesting strings like:

"Scrivi il messaggio e premi INVIO, control Z, INVIO... "
"Inserisci la password SEGRETA e premi INVIO!! "
"Stai per creare un messaggio segreto                    con"


those strings were effectively referenced in the binary. By taking a look at the referencing code I discovered that if the binary doesn't found the encrypted resource, it enters in another state and allows to create a secret message. So I removed the resource and started the program again. The image below show how to create a secret message.


Since I created a new protected message I'm finally able to see which is the screen displayed to the user when a message is correctly decrypted. From this screen I can see that the first 8 bytes are always the same and their value is: "Oggetto:". Finally we have all the missing pieces of our puzzle.

Break the rule!

We reached the end of the writeup, let's do a quick recap of the attack:

P = D(E(C, k2), k3) => E(P, k3) = E(C, k4) =>
E("Oggetto:", k3) = E("\xA8\xEC\xE8\x6E\x9D\xB5\xE1\xB7", k4)


I have to compute the two parts for each k3 and k4 until I found two keys that generates the same value.

So, the implementation of the Meet In The Middle attack is composed of two steps, in the first part I encrypt the plaintex with all keys from the 24 bit keyspace and save the result and the key. Then I proceed to encrypt the ciphertext with each possible key and try to find a match with the first step. If a match is found I broke the encryption.

On my laptop it took a while to complete. In the following result you can see the execution of the first step of the attack:


-=[ Start encrypt plaintext: 6/6/2019 2:54:27 PM ]=-
Start iteration 0 of 7 at 6/6/2019 2:54:27 PM
Start iteration 1 of 7 at 6/6/2019 3:07:01 PM
Start iteration 2 of 7 at 6/6/2019 3:18:45 PM
Start iteration 3 of 7 at 6/6/2019 3:32:16 PM
Start iteration 4 of 7 at 6/6/2019 3:45:15 PM
Start iteration 5 of 7 at 6/6/2019 3:58:26 PM
Start iteration 6 of 7 at 6/6/2019 4:10:37 PM
Start iteration 7 of 7 at 6/6/2019 4:22:27 PM
-=[ End encrypt plaintext: 6/6/2019 4:34:14 PM ]=-


And here is the second part of the attack where you can see that the password was successfully bruteforced:


-=[ Populate storage from pre-built table: 6/6/2019 5:56:37 PM ]=-
-=[ Start identify key: 6/6/2019 5:58:03 PM ]=-
Start iteration 0 of 7 at 6/6/2019 5:58:03 PM
Start iteration 1 of 7 at 6/6/2019 6:01:58 PM
Encrypt Password found: 20-8A-34-40-00-00-00-00
Decrypt Password found: 80-A0-DE-1C-00-00-00-00
-=[ End identify key: 6/6/2019 6:08:43 PM ]=-
-=[ Secret message: 6/6/2019 6:08:47 PM ]=-
Oggetto: Finché la barca va.

Quell'augel d'ebano, allora, così tronfio e pettoruto
tentò fino ad un sorriso il mio spirito abbattuto:
«Sebben spiumato e torvo, - dissi, - un vile non sei tu
certo, o vecchio spettral corvo della tenebra di Pluto?
Quale nome a te gli araldi dànno a corte di Re Pluto?»
Disse il corvo allor: «HM{2005d05af414ac92a3ffc5beecbd94f4}!».

PS: questo «4DES» non mi sembra molto sicuro. ho dei seri dubbi sull'algo-
ritmo di hashing della password, e comunque quando si implementa un algorit-
mo non standard si rischia sempre di fare degli erroi grossolani. anche ba-
nali errori di copia-incolla possono essere fatali per la sicurezza. E poi
il logo è così lento a disegnarsi! Troviamo un'alternativa?


Once that I retrieve the keys I'm able to decrypt the text and visualize the FLAG (which is HM{2005d05af414ac92a3ffc5beecbd94f4}), as can be seen from the following video:


Conclusion

This challenge was very entertaining, not because of the reversing part (that was pretty easy to be honest) but because was built with the idea to show how difficult is to implement a new cryptographic algorithm by demonstrating how a real world attack works.

Side Note

The challenge is full of funny comments having joke of hackers. The author told me that she created this challenge by considering a middle-aged developer.

The final message is an excerpt from the poem "The Raven" where the quote "Nevermore" was replaced with the MD5 of "Barbra Streisand" (the actual CTF flag value). This is a tribute to a meme that was popular at that time (actually I didn't realize this thing, it was the author that told me to search for that MD5).

Source Code

The full source code is on my Github account, I report here just the most important parts to break the encryption (for an updated version please visit the Github website).

namespace Hm0x14Writeup

open System
open System.Text
open System.IO
open System.Collections.Generic
open System.Reflection

module Program =    

 let mangleKey(k0: Int32, k1: Int32, k2: Int32, k3: Int32) = [|
  byte k0 <<< 5
  byte k1 <<< 1
  byte k2 <<< 1
  byte k3 <<< 1
  0uy
  0uy
  0uy
  0uy
 |]

 let getKeys() = seq {
  for i0=0 to 0x7 do
   Console.WriteLine("Start iteration {0} of 7 at {1} ", i0, DateTime.Now)
   for i1=0 to 0x7F do
    for i2=0 to 0x7F do
     for i3=0 to 0x7F do
      yield (mangleKey(i0, i1, i2, i3))
 }

 let buildEncryptedTextTable(plainText: Byte array, storage: Dictionary<String, Byte array>) =
  Console.WriteLine("-=[ Start encrypt plaintext: {0} ]=-", DateTime.Now)

  Utility.getKeys()
  |> Seq.iter(fun key ->
   try
    let encryptedBuffer = Encryption.encrypt(plainText, key)
    storage.[BitConverter.ToString(encryptedBuffer)] <- key
   with _ -> ()
  )

  Console.WriteLine()
  Console.WriteLine("-=[ End encrypt plaintext: {0} ]=-", DateTime.Now)
  Console.WriteLine()

 let populateStorage(storage: Dictionary<String, Byte array>) =
  if not <| Storage.storageExists() then
   let plainText = Encoding.UTF8.GetBytes("Oggetto:")
   buildEncryptedTextTable(plainText, storage)
   Storage.saveEncryptedText(storage) 
  Storage.loadEncryptedText(storage)

 let findKey(encryptedText: Byte array, storage: Dictionary<String, Byte array>) =
  Console.WriteLine("-=[ Start identify key: {0} ]=-", DateTime.Now)
  let mutable (encKey, decKey) = (Array.empty<Byte>, Array.empty<Byte>)

  Utility.getKeys()
  |> Seq.iter(fun key ->
   try
    let encryptedBuffer = Encryption.encrypt(encryptedText, key) |> BitConverter.ToString
    if storage.ContainsKey(encryptedBuffer) then
     encKey <- storage.[encryptedBuffer]
     decKey <- key
     Console.WriteLine("Encrypt Password found: " + BitConverter.ToString(storage.[encryptedBuffer]))
     Console.WriteLine("Decrypt Password found: " + BitConverter.ToString(key))                
     Console.ReadLine() |> ignore
   with _ -> ()
  )

  Console.WriteLine()
  Console.WriteLine("-=[ End identify key: {0} ]=-", DateTime.Now)
  Console.WriteLine()

  (encKey, decKey)

 let getCipherText() =
  let curDir = Path.GetDirectoryName(Assembly.GetEntryAssembly().Location)
  File.ReadAllBytes(Path.Combine(curDir, "4DES_SEGRETO"))

 [<EntryPoint>]
 let main argv = 
  let storage = new Dictionary<String, Byte array>()
  populateStorage(storage)

  // decrypt the cipher text
  let ciphertext = getCipherText()     
  let (encKey, decKey) = findKey(ciphertext.[0..7], storage)

  // print the cipherText
  let secretMessage = Encryption.twoDesDecrypt(encKey, decKey, ciphertext)
  Console.WriteLine(secretMessage)
  0